Support Wizard
Creating or Joining an Account - Creating a User Account
If you're a UK instructor, visit the TurnitinUK.com account creation form.
If you're an instructor outside of the UK, visit the Turnitin.com account creation form.
Fill in the account creation form, following the onscreen instructions.
The account ID and join password is required, and can only be gained from your account administrator.
Need further guidance? Read more...
Creating or Joining an Account - Joining an Account
From your instructor homepage, click the Join Account tab.
The account ID and join password is required, and can only be gained from your account administrator.
Note: With a single Turnitin account, you can create classes and assignments in multiple institions at once.. This information can be obtained from each institution's Turnitin administrator.
Need further guidance? Read more...
Creating or Joining an Account - Joining an Account as a TA
From your instructor homepage, click the Join Account (TA) tab.
The master class ID and TA join password is required, and can only be gained from your instructor.
Click Submit.
Set your section name and enrollment password, then click Submit.
Need further guidance? Read more...
Logging In
If you're a UK instructor, visit the TurnitinUK.com login page.
If you're an instructor outside of the UK, visit the Turnitin.com login page.
Need further guidance? Read more...
Logging In - Resetting a Password
If you're a UK instructor, visit the TurnitinUK.com password reset page.
If you're an instructor outside of the UK, visit the Turnitin.com password reset page.
Your email and last name is required, and can be gained from your account administrator.
You must answer your secret question. If you can't remember, click Forgot your answer.
Need further guidance? Read more...
Managing Classes - Creating a Class
Click the green + Add Class button.
Enter all class details.
If you're adding a master class, you must also enter a TA join password.
Your class enrollment and TA join password must be between 4 and 12 characters.
Click Submit.
Need further guidance? Read more...
Managing Classes - Changing a Class Enrollment Password
From your instructor homepage, click the edit (cog) icon.
From the class update page, amend the class enrollment password, then click Submit.
Managing Classes - Reactivating an Expired Class
From your instructor homepage, click the edit (cog) icon.
From the class update page, amend the class end date, then click Submit.
Need further guidance? Read more...
Managing Classes - Copying a Class
From your instructor homepage, click the copy icon.
From the copy class page, amend the class name and enrollment password.
Set the start date and time for the first assignment in your class, then click Save.
Need further guidance? Read more...
Managing Classes - Editing Outside of an LMS
Assignments created through an LMS can only be edited within the LMS in which they were created. Therefore, you cannot edit your classes at Turnitin.com or TurnitinUK.com. You may receive an error message stating that 'editing has been disabled for this native account'.
Need further information? Read more...
Managing Classes - Inactive Accounts
When your institution's Turnitin license expires, all classes in that account will change to read only/expired mode. Your institution's Turnitin account administrator needs to contact their Turnitin sales representative in order to renew the Turnitin license.
Once the institution's account is renewed, your classes will become available again.
Note: Student submissions are not available for inactive accounts. Once the inactive account is renewed, submissions will become available again.
Managing Assignments - Creating an Assignment
From your instructor homepage, click the class title.
Click the green + Add Assignment button.
Select Paper Assignment as your assignment type, and click Next step.
Enter all assignment details, as well as any optional settings, then click Submit.
Need further guidance? Read more...
Managing Assignments - Applying Online Grading Settings
From your instructor homepage, click the class title.
Click More Actions, then Edit settings.
Select + Optional settings and scroll down to GradeMark.
From here, you can amend your rubric and ETS® e-rater® settings.
Click Submit to save these changes.
Need further guidance? Read more...
Managing Assignments - Using Quick Submit
To ensure Quick Submit is enabled, click User Info from the top of your instructor homepage.
Under Account Settings, ensure Activate quick submit is set to Yes, then click Submit.
From your instructor homepage, click the Quick Submit tab, then click Submit.
Customize your search, then click Submit.
Enter the submission details and choose the file you wish to upload, then click Upload.
Check your submission, then click Confirm.
Need further guidance? Read more...
Managing Assignments - Using the Assignment Inbox
From your instructor homepage, click the class title.
For the assignment you wish to access, click View.
Use the Assignment Inbox to view submissions that you or your students have made.
Use the Assignment Inbox to organize student papers or view GradeMark reports.
Need further guidance? Read more...
Managing Assignments - Viewing Submitted Papers in the Document Viewer
From your instructor homepage, click the class title.
For the assignment you wish to access, click View.
Click the title of the paper to open the Document Viewer.
Need further guidance? Read more...
Managing Assignments - Extending an Assignment
From your instructor homepage, click the class title.
Click More Actions, then Edit settings.
From the class update page, amend the assignment end date, then click Submit.
Managing Assignments - Allowing Resubmissions
Click the class title from your instructor homepage.
Click More Actions, then select Edit from the dropdown.
Click + Optional Settings.
Scroll to the Generate Originality Reports for student submissions section.
Select immediately (can overwrite reports until due date).
Click Submit.
Need further guidance? Read more....
Managing Assignments - The Post Date Explained
The post date feature is available for accounts using the grade book, online grading tools, or PeerMark. The post date is the date that grades and marked papers will be released for student view, meaning all students in a class will receive their feedback at the same time. It is recommended that the post date is set after the due date of an assignment, giving you time to leave feedback on student papers. However, if you prefer that feedback is released to students prior to the due date, this is possible, too. For PeerMark assignments, the post date must always be after the due date.
Note: Students cannot access grades or papers reviewed using online grading tools or PeerMark until the assignment post date/time has passed.
Managing Assignments - Editing Outside of an LMS
Assignments created through an LMS can only be edited within the LMS in which they were created. Therefore, you cannot edit your classes at Turnitin.com or TurnitinUK.com. You may receive an error message stating that 'editing has been disabled for this native account'.
Need further information? Read more...
Managing Assignments - Opt Against Saving Submissions to the Turnitin Database
When a paper is submitted to Turnitin, the papers are generally saved to the Turnitin student repository database; this is to ensure that if the same paper (or parts of the paper) are submitted again, Turnitin will be able to find the match and flag this as possible plagiarism. This functionality is enabled by default. Instructors can opt against having submitted papers saved to any database.
When creating a new assignment, do the following:
Click the class name.
Click the + Add Assignment button, then choose Paper Assignment.
Create a name for the assignment and set the start, due, and post dates.
Click the Optional Settings link, towards the bottom of the page.
Scroll down to the Submit papers to: drop-down menu.
Select no repository.
Click the Submit button to save this assignment.
If you would like to change the settings for an existing assignment, do the following:
Click the class name.
Click More Actions for the assignment you wish to edit.
Click Edit settings from the drop-down menu.
Click the Optional Settings link, towards the bottom of the page.
Scroll down to the Submit papers to: drop-down menu.
Select no repository.
Click the Submit button to save this assignment.
Note: The new settings will only affect future submissions and not already-submitted papers.
Need further information? Read more...
Managing Assignments - Viewing Paper Information
Click the relevant class name in which the paper in question resides.
Click View alongside the assignment in which the paper in question resides.
Click either the paper title or the similarity score to open the document viewer in a new window.
Click the i icon, located in the bottom left corner of the document viewer.
This will display the paper information, which, among other pieces of information, includes the submission ID, word count, resubmission count, and date last submitted.
Late Submissions - Allowing Late Submissions
From your instructor homepage, click the class title.
If you are creating a new assignment where late submissions will be allowed, click the green + Add Assignment button, select Paper Assignment as your assignment type, then click Next step.
If you are editing an existing assignment to allow late submissions, click More Actions next to the assignment you wish to edit, then select Edit from the dropdown.
Click + Optional Settings.
Enter or edit any assignment details, as well as any optional settings.
To allow late submissions, you must ensure that Yes is selected under the optional setting: Allow submissions after the due date.
Click Submit.
Late Submissions - Sending a Reminder to Students
From your instructor homepage, click the class title.
For the assignment you wish to access, click View.
Click Email non-submitters.
Compose your email, then click Send.
Need further guidance? Read more...
Late Submissions - Viewing Late Submissions
From your instructor homepage, click the class title.
For the assignment you wish to access, click View.
Any late submissions will appear in red in the Date column.
Need further guidance? Read more...
Contacting Your Turnitin Administrator
From your instructor homepage, click the account name for which you would like to contact the administrator.
In the top right-hand corner, click send administrator an email to open your device's email client.
Alternatively, right-click on send administrator an email and click copy email address (this text may differ depending on your browser-type). Paste this email address into your preferred email client.
Submitting Papers for Students
From your instructor homepage, click the class title.
Click More Actions, then Submit.
Enter the submission details and choose the file you wish to upload, then click Upload.
Check your submission, then click Confirm.
Need further guidance? Read more...
Submitting Papers for Students - Uploading a Single File
Click the class name for the assignment you wish to access.
From the Actions column, click View for the assignment you wish to submit a paper to.
Click the Submit File button to the left of the page.
Ensure Single File Upload is selected from the Submit: dropdown list at the top of the page. If Cut & Paste Upload or Zip File Upload is selected, you must change this before continuing.
If you are submitting on behalf of a non-enrolled student, select Non-Enrolled Student from the Author dropdown list, then enter the student's first name and last name, as well as the submission title.
If you are submitting on behalf of an enrolled student, select their name from the Author dropdown list, then enter the submission title.
You can choose your file from your computer, Dropbox, or Google Drive by clicking the respective buttons under Choose the file you want to upload to Turnitin:
By clicking Choose from your computer, this will allow you to locate and select the file from your device.
To upload a file from either Dropbox or Google Drive, you must log into these external services before you will be able to locate and select your file.
Once you have selected your file, click the Upload button. Turnitin will process the file, which should take no longer than two minutes to complete.
After upload, a preview of the file will appear to the right-hand side of the page. Please confirm the submission by clicking the Confirm button.
You will see a confirmation screen with a Submission ID at the bottom of the page. Please make a note of this for reference.
Note: You must choose an enrolled student from the Author drop down list in order for that student see that you've submitted on his or her behalf. Only enrolled students are able to see the results of your submission i.e. the Originality Report.
Submitting Papers for Students - Uploading Multiple Files
From your instructor homepage, click the class title.
Click More Actions, then Submit.
Click Multiple File Upload from the Submit: dropdown menu.
Click the Choose file button to begin selecting files from your device.
Allow the paper to process, then select the relevant student's name from the Enrolled Student dropdown list.
Note: If your file is not accepted, you will be provided with a reason for this failure.
If the student you are submitting on behalf of is not enrolled in the class, enter their first name and last name in the text fields provided.
Enter the submission title.
Repeat this process for each multiple upload.
To exclude selected papers from being submitted to Turnitin, use the checkboxes alongside the paper to deselect them.
Click the Upload all button to upload the files to Turnitin. Alternatively, to cancel the operation, click Delete all beneath the list of uploaded papers.
The following page will advise you of the files that have been accepted, along with any files that have been rejected, requiring review.
Once you have reviewed all of your uploaded files, click the Submit button.
You will be directed to the assignment inbox, where all submissions to the assignment are listed.
Submitting Papers for Students - Activating Quick Submit
Click User Info from the top of any Turnitin page.
Under the Account Settings column, select Yes from the Activate quick submit drop-down menu.
Scroll to the bottom of the page and click Submit to save this change.
Submitting Papers for Students - Using Quick Submit
To ensure Quick Submit is enabled, click User Info from the top of your instructor homepage.
Under Account Settings, ensure Activate quick submit is set to Yes, then click Submit.
From your instructor homepage, click the Quick Submit tab, then click Submit.
Customize your search, then click Submit.
Enter the submission details and choose the file you wish to upload, then click Upload.
Check your submission, then click Confirm.
Need further guidance? Read more...
Submitting Papers for Students - Experiencing Upload Issues
If an assignment is set to Allow Any File Type, Turnitin will accept any file that is less than 40mb (or approximately two million characters), a minimum of 25 words, less than 400 pages in length. Papers must not contain spaces in between every letter (l i k e t h i s).
If the assignment is set to Allow only file types that Turnitin can check for originality, only files that can generate Similarity Reports will be allowed to be submitted to the assignment.
Turnitin will currently accept the following file types to generate Similarity Reports:
- Microsoft Word® (.doc / .docx)
- OpenOffice Text (.odt)2
- Google Docs via Google Drive™ (.gdoc files are NOT acceptable; please use Google Drive to upload .gdoc files)
- WordPerfect® (.wpd)
- PostScript (.ps/.eps)
- Adobe® PDF
- Microsoft PowerPoint® (.pptx, .ppt, .ppsx, and .pps)
- Microsoft Excel® (.xls and .xlsx)
- HTML
- Rich text format (.rtf)
- Plain text (.txt)
- Hangul Word Processor file (.hwp)
Please note that we do not support:
- Microsoft® Works (.wps) file types .
- Apple Pages file types
- Spreadsheets created outside of Microsoft Excel (.ods).
If you are using an unsupported word processor, you may need to save the file as a .txt or .rtf file in order to upload to Turnitin.
If submitting with Google Drive™ online storage service, third party cookies must be allowed in your browser, or attempts to sign into Google to upload from Google Drive will fail. Please note that the Google Drive functionality is not supported with IE8 or below.
Need further guidance? Read more...
Managing Students - Locking and Unlocking Students
Students can be locked or unlocked from a class once they have logged into Turnitin with their user profile. Locking a student will prevent the student profile from accessing the class.
From your instructor homepage, click the class title.
From the class homepage, click the Students tab.
Click the padlock icon next to the student you wish to lock or unlock, then click OK.
Need further guidance? Read more...
Managing Students - Removing Students
Students should be dropped from a class only if you are absolutely certain that the student user profile and its submissions are no longer needed. Dropped students cannot re-add themselves to the class.
From your instructor homepage, click the class title.
From the class homepage, click the Students tab.
Click the trash can icon next to the student you wish to remove, then click OK.
Need further guidance? Read more...
Managing Students - Adding Students Individually
From your instructor homepage, click the class title.
From the class homepage, click the Students tab.
Click the Add Student button.
Enter your student's details, then click Submit.
Need further guidance? Read more...
Managing Students - Adding Students from a List
From your instructor homepage, click the class title.
From the class homepage, click the Students tab.
Click the Upload Student List button.
Choose the file you wish to upload, then click Upload List.
Review your uploaded list in Turnitin, then click Yes, Submit.
A student list must be 100 entries or less. The list must be a Microsoft Word, Excel, or plain text (.txt) file. The student's first name, last name, and Email address must be provided. To create your list, view our Word, Plain text and Excel formatting examples.
Need further guidance? Read more...
Managing Students - Allowing Students to Self Enroll
From your instructor homepage, note down the relevant seven-digit Class ID.
Click the edit (cog) icon.
From the class update page, make a note of the enrollment password.
Share the Class ID and enrollment password with your students.
Need further guidance? Read more...
Managing Students - Allowing Students to Self Enroll
If you are experiencing issues with adding students to a class, you may wish to view the student count for your institution to ensure that the student limit has not been reached. From the instructor homepage, click on the name of your institution to view the account's student limit and the number of active students.
The following information may help to resolve any student limit issues you encounter:
Multiple enrollments: Multiple enrollments can occur when a single student creates a new account for different classes within the same institution. Please advise students to visit the Turnitin support wizard directly and simply click the Raise a Ticket button at the bottom of this page.
Our support team can merge multiple accounts into one, whilst retaining student submissions, providing the student can prove ownership of each email address. Students must specify which email address that they would like to continue using in Turnitin, and provide the email address of all accounts that require consolidation. Once consolidated, this process cannot be undone.
You can also check for and delete multiple enrollments (duplicate accounts) of the same student by following these steps:
From the instructor homepage, click the relevant class name.
Click the Students tab located at the top of the class homepage.
Click Student name above the list of student names.
Look for any duplicate names in the newly alphabetized list.
Look at the dates next to the multiple students' names.
Click the drop (trash can) icon for all duplicated student names, except the version with most recent date.
Note: When a student account is dropped from a class, their submissions are also deleted.
Students in expired classes: Students in expired classes do not count against your institution’s student limit. If instructors do not expire outdated classes, students from a previous term will still be counted. Please expire any unused classes.
You can expire unused classes by doing the following:
From the Instructor homepage, click on the edit (cog) icon for the relevant class.
From the class update page, amend the class end date to a date in the near future, then click Submit.
Similarity Reports - Viewing a Similarity Report
From the Turnitin Classic document viewer...
Click the filter and settings (funnel) icon in the bottom left-hand corner.
Choose to exclude, quotes and/or bibliography, then click Apply Changes.
Need further guidance? Read more...
Similarity Reports - Interpreting a Similarity Report
Turnitin does not check for plagiarism in a piece of work. We will check a student's work against our database. If there are instances where a student's writing is similar to, or matches against, one of our sources, we will flag this for your review.
Our system uses an advanced algorithm to find the 'best' sources that match text within student papers; we call this the 'match overview' in the similarity report. The match breakdown shows a breakdown of the sources found in the match overview. Therefore, the match breakdown reveals any additional sources that overlap the same matching content contained within a selected match overview source.
If your student has used quotes and has referenced correctly, there will still be instances where a match will be found. The similarity score makes you aware of problem areas in a student's paper; you can then use this as a tool as a part of a larger process, in order to determine if the match was acceptable.
The similarity percentage indicates the overall similarity score of the paper, based on how much matching text was found (as a percentage of the total text in the submission). A breakdown of the scores with the color code is listed below:
- Blue - 0% (a valid result)
- Green - 1-24%
- Yellow - 25-49%
- Orange - 50-74%
- Red - 75-100%
Once you see the percentage icon, this means that the report has generated. By clicking on the icon, the report will load in the document viewer.
Need further information? Read more...
Similarity Reports - Excluding Quoted Material
From the Turnitin Classic document viewer...
Click the filter and settings (funnel) icon in the bottom left-hand corner.
Choose to exclude quotes and/or bibliography.
Click Apply Changes.
Need further guidance? Read more...
Similarity Reports - Excluding Small Matches
From the Turnitin Classic document viewer...
Click the filter and settings (funnel) icon in the bottom left-hand corner.
Choose to exclude matches less than a specific percentage of words or number of words.
Click Apply Changes.
Need further guidance? Read more...
Similarity Reports - Generating a New Similarity Report
From the Turnitin Classic document viewer...
Click the filter and settings (funnel) icon in the bottom left-hand corner.
Click New Report, check the warning information, then click OK.
Note: The new report may take several minutes to generate.
Need further guidance? Read more...
Similarity Reports - Downloading Reports and Digital Receipts
From the Turnitin Classic document viewer...
Click the printer icon in the bottom right-hand corner.
To download the similarity report, activate the similarity layer, then click Download PDF of Current View.
To download the digital receipt click Download of Digital receipt for printing.
Need further guidance? Read more...
Similarity Reports - Report Generation Timescales
The similarity report for an initial file/paper submission is created within approximately ten minutes.
Note: Similarity reports for resubmitted assignments take 24-hours to regenerate; the similarity report and the similarity score (percentage) will not be available during this time.
Note: The 24-hour delay of similarity reports for resubmitted papers does not apply when an instructor submits on behalf of a student (after deleting the original submission from the inbox).
Need further guidance? Read more...
Similarity Reports - Request Match Paper from Another Instructor
When a paper submitted to your class indicates a high percentage match to a paper submitted to a different institution, you can make a request to view this paper at another institution. Turnitin does not handle the paper exchange directly, but we do facilitate the transaction. Because of Turnitin's security and privacy policy associated with the student paper database, this information must to be passed from instructor to instructor outside of Turnitin.
From the Turnitin Classic document viewer...
Click the match overview (graph) icon in the bottom left-hand corner.
From the Match Overview side panel, click the arrow alongside the student paper source to reveal the match breakdown.
Hover over the submission you would like to view, then click the upwards pointing arrow.
The request paper page will appear.
Click the send a request to view this paper button.
A request will be sent via email to the other instructor. If the instructor replies to your request, the paper will be copied into the body of the return email.
Note: It is the choice of the Instructor that you contact as to whether they decide to share the paper. If the instructor that receives the request decides to share the paper, the process is as follows:
The instructor receives an email request.
The email will contain the 'original content' in the body of the email (the content being the full paper you've requested).
At this point, they can choose to reply. If they select reply, the original paper should be transferred in the body of the reply email.
The instructor making the request should have received the email from the instructor, granting access to the matching paper. Communication, at this point, may continue between instructors.
Note : Although Turnitin tries to make the paper transfer process as easy as possible, there can be some issues with transferring. For example, the receiving instructor may use an email client that strips the content or they might overwrite or delete the content accidentally. Turnitin plays no role in a match paper request after the original request has been made.
Similarity Reports - Causes for Submission Self-Match
If a student submits the same paper to multiple assignments (including revision assignments) in the same class, these papers will not match each other in a similarity report. This allows students and instructors to use the Turnitin similarity report as part of the review and resubmit process, without generating a 'false positive'.
Note: Similar papers submitted to a different class or via different accounts will match each other, even if they are submitted to the same instructor. Also, if an instructor submits the same paper as a 'non-enrolled student' to the assignment, then thiis will match the student's paper.
Similarity Reports - Opt Against Saving Submissions to the Turnitin Database
When a paper is submitted to Turnitin, the papers are generally saved to the Turnitin student repository database; this is to ensure that if the same paper (or parts of the paper) are submitted again, Turnitin will be able to find the match and flag this as possible plagiarism. This functionality is enabled by default. Instructors can opt against having submitted papers saved to any database.
When creating a new assignment, do the following:
Click the class name.
Click the + Add Assignment button, then choose Paper Assignment.
Create a name for the assignment and set the start, due, and post dates.
Click the Optional Settings link, towards the bottom of the page.
Scroll down to the Submit papers to: drop-down menu.
Select no repository.
Click the Submit button to save this assignment.
If you would like to change the settings for an existing assignment, do the following:
Click the class name
Click More Actions for the assignment you wish to edit
Click Edit settings from the drop-down menu.
Click the Optional Settings link, towards the bottom of the page.
Scroll down to the Submit papers to: drop-down menu.
Select no repository.
Click the Submit button to save this assignment.
Note: The new settings will only affect future submissions and not already-submitted papers
Need further guidance? Read more...
Similarity Reports - Excluding Sources
From the Document Viewer...
From the Turnitin Classic document viewer...
Click the match overview (graph) icon in the bottom left-hand corner.
Hover over the match for which you would like to exclude sources.
Click the arrow alongside the match to view the match breakdown.
Click the Exclude Sources button and use the checkboxes to exclude the relevant sources.
As you click to exclude sources, the number of selected sources will be counted inside the red Exclude button.
Click the red Exclude button to exclude your selected sources from the similarity report.
Your recent exclusions will provide you with an updated similarity score.
Need further guidance? Read more...
Similarity Reports - Viewing and Restoring Excluded Sources
From the Turnitin Classic document viewer...
Click the view/edit excluded sources (no entry) icon in the bottom left-hand corner.
To restore only a select few sources, use the checkboxes to make your selection, then click the Restore button.
To restore all excluded sources, click the Restore All button.
Your restorations will provide you with an updated similarity score.
Need further guidance? Read more...
Online Grading - Creating QuickMarks
From the Turnitin Classic document viewer...
Ensure the GradeMark layer is active.
Click the QuickMark Manager (spanner) icon from the QuickMark sidebar.
Click the name of the set in which you'd like to add a new QuickMark.
Click the + icon next to MARKS.
Enter your QuickMark details, then click Save.
You can now apply this QuickMark to a paper by closing the QuickMark manager, selecting the chosen set from the drop-down menu, then dragging the QuickMark comment anywhere on top of the paper.
Need further guidance? Read more...
Online Grading - Exporting/Downloading a QuickMark Set
From the Turnitin Classic document viewer...
Ensure the GradeMark layer is active.
Click the QuickMark Manager (spanner) icon from the QuickMark sidebar.
Click on the name of a QuickMark set to export it.
Click the import/export (arrow) icon, then click Export Set...
Click OK to save the file.
Need further guidance? Read more...
Online Grading - Importing/Uploading a QuickMark Set
Ensure the GradeMark layer is active.
Click the QuickMark Manager (spanner) icon from the QuickMark sidebar.
Click on the name of a QuickMark set to export it.
Click the import/export (arrow) icon, then click Import Set...
Click the Choose file button to locate the file(s) on your device.
Click the Import button to upload your .qms file to the QuickMark manager.
Click the Close button to view the QuickMark set.
Need further guidance? Read more...
Online Grading - Using Rubrics and Grading Forms
Rubric scorecards can be used to evaluate student work based on defined criteria and scales. Grading forms can be used to provide free form feedback and scores to evaluate student work based on defined criteria. The rubric scorecards can be created by the account administrator and shared to all instructors on an account. Instructors can also create and share rubric scorecards, allowing other instructors to upload the rubric scorecard to their classes.
Need further guidance? Read more...
Online Grading - Entering a Grade
From the Turnitin Classic document viewer...
Click the grade box in the top right-hand corner, displayed alongside the assignment's point value. e.g. -- /100.
Enter a grade into the textbox.
The grade box automatically displays ' -- ' until a grade is entered. Grades entered in this field will be saved to the grade book.
Online Grading - Scaling and Dropping Grades
From your instructor homepage, click the class title.
From the class homepage, click the Grade Book tab.
Click the Scale button.
Enter a new value in the scaled value field, ensuring the values total 100% by the end of the class.
Click Submit.
To drop the lowest grade for all students, select Yes from the dropdown list, then click Submit.
You can reinstate a dropped grade, by selecting No from the dropdown list, then click Submit.
Need further guidance? Read more...
Online Grading - Making ETS e-rater® Feedback Available to Students
ETS e-rater® functionality was added to help instructors with evaluating their students' papers. Students cannot see any comments (including e-rater®) until the assignment's post date has passed. As e-rater® technology is integrated with Turnitin's online grading tools, instructors must view a student's paper to load and review the the e-rater® comments that have been generated in Turnitin. This ensures that all e-rater® comments are authorized by the instructor before students gain access to them.
To clarify, instructors must access GradeMark in the document viewer once the post date has passed; instructors must wait for the ETS e-rater® comments to load, and adds a grade or comment. The student can, at this point, view their e-rater® marks.
e-rater®, ETS and the ETS logo are registered trademarks of Educational Testing Service (ETS) and used under license.
PeerMark - Creating a PeerMark Assignment
From your instructor homepage, click the class title.
Click the green + Add Assignment button.
Select PeerMark Assignment as your assignment type, and click Next step.
Select the paper assignment that the PeerMark assignment is based on.
Enter all assignment details, as well as any optional settings, then click Save & Continue.
Click Edit to select the number of papers each student will review, then click Save.
Click Save & Continue, then click the Add Question button.
Enter your question details in scale or free response format, or add from library, then click Save & Finish.
Need further guidance? Read more...
PeerMark - Writing a Peer Review for a Student
From your instructor homepage, click the class title.
For the PeerMark assignment you wish to access, click View.
Click More Actions for the student you wish to peer review.
Click Write instructor review to open the PeerMark Document Viewer.
Under the Questions tab to the left of the page, answer the PeerMark question(s).
Click Submit in the top right-hand corner, then click Return to Assignment Inbox.
Need further guidance? Read more...
PeerMark - Leaving Comments on a Peer Review
Within PeerMark an instructor may comment on the paper they are reviewing. A comment is equivalent to the notes that an instructor may write in the margins of a paper.
From your instructor homepage, click the class title.
For the PeerMark assignment you wish to access, click View.
Click More Actions for the paper you wish to leave comments on whilst peer reviewing.
Click Write instructor review to open the PeerMark Document Viewer.
Click anywhere on the paper to make a comment, and enter your comment in the textbox.
Click Save.
Need further guidance? Read more...
Resolve Technical Issue - Check Turnitin's Known Issues
Your technical issue may be down to an issue that we're aware of and working to fix, or could be a result of the Turnitin system status.
To check the known issues page, click here.
To check the Turnitin system status, click here, or visit twitter.com/turnitinstatus for live updates.
Alternatively, you may wish to follow steps on your device to resolving your technical issues.
Resolve Technical Issue - Resolve Technical Issues
Turnitin operates via your computer's internet browser; no computer install is required. If you are experiencing issues with Turnitin, systematically follow the steps below to identify the cause of your issue.
Please confirm that your computer meets the minimum system requirements.
Try to access Turnitin via an alternative internet browser.
Update your Java to the latest version available.
Ensure your browser’s pop-up blocker is temporarily disabled while using Turnitin.
Add the following URLs to your firewall's safe list: *.turnitin.com, cdn.turnitin.com, *.edgecastcdn.net, *.turnitinuk.com (the * symbol must also be included).
Try temporarily disabling your firewall while determining the cause of the problem. Many anti-virus applications have firewalls built-in (e.g. McAfee, Norton, or AVG).
Close your entire web browser and restart your computer.
Open your browser, then try to access Turnitin again.
If your issues persist, please consider accessing Turnitin via a different computer.
Resolve Technical Issue - Experiencing Upload Issues
If an assignment is set to Allow Any File Type, Turnitin will accept any file that is less than 40mb (or approximately two million characters), a minimum of 25 words, less than 400 pages in length. Papers must not contain spaces in between every letter (l i k e t h i s).
If the assignment is set to Allow only file types that Turnitin can check for originality, only files that can generate Similarity Reports will be allowed to be submitted to the assignment.
Turnitin will currently accept the following file types to generate Similarity Reports:
- Microsoft Word® (.doc / .docx)
- OpenOffice Text (.odt)2
- Google Docs via Google Drive™ (.gdoc files are NOT acceptable; please use Google Drive to upload .gdoc files)
- WordPerfect® (.wpd)
- PostScript (.ps/.eps)
- Adobe® PDF
- Microsoft PowerPoint® (.pptx, .ppt, .ppsx, and .pps)
- Microsoft Excel® (.xls and .xlsx)
- HTML
- Rich text format (.rtf)
- Plain text (.txt)
- Hangul Word Processor file (.hwp)
Please note that we do not support:
- Microsoft® Works (.wps) file types .
- Apple Pages file types
- Spreadsheets created outside of Microsoft Excel (.ods).
If you are using an unsupported word processor, you may need to save the file as a .txt or .rtf file in order to upload to Turnitin.
If submitting with Google Drive™ online storage service, third party cookies must be allowed in your browser, or attempts to sign into Google to upload from Google Drive will fail. Please note that the Google Drive functionality is not supported with IE8 or below.
Need further guidance? Read more...
Viewing Turnitin Release Notes
We are constantly working to improve our service, and perform regular system updates to implement new features, fix any bugs, and ensure the system is working correctly during peak submission times.
Want to stay up to date on each of our releases? Read more...
New Feature Ideas
We love hearing new and innovative ideas on how we can improve Turnitin. Simply drop our Product Support team an email with ‘FEEDBACK’ in the title, and we’ll make sure the right team gets your input.
You can contact our support team at tiisupport@turnitin.com
Make a Request to a Turnitin Administrator - Delete a Paper
A student submission can be permanently deleted from the Turnitin database so that it can no longer be used as a searchable source. Please contact your Turnitin administrator regarding the deletion of a paper from the Turnitin database. For contractual reasons, all paper deletion requests must be submitted in writing by your Turnitin administrator. Please provide them with the class ID, assignment name, and the submission ID associated with the paper.
Rather than having to delete papers from the database, you may find it easier to create assignments that will not store submitted papers in the Turnitin database. Simply select No repository when creating or amending an assignment. Click here for guidance on repository options.
Make a Request to a Turnitin Administrator - Restore a Paper
If you have accidentally deleted a student paper from the assignment inbox, it may be possible for the Turnitin support team to restore the paper.
To make your request, simply click the Raise a Ticket button at the bottom of this page.
Please provide the class ID, assignment name, student's first and last name, student's email address, and the submission ID associated with the paper.
Note: If a paper has been deleted from the assignment inbox and no submission is showing for the student, it is usually possible to restore a paper. However, if a new paper was submitted after the paper's deletion, it will be overwritten by the new submission and cannot be recovered.
If the No Repository option was selected for this assignment, a 90-day grace period will allow a paper's restoration; on day 91, the deleted paper will be purged from our database and cannot be restored.
Make a Request to a Turnitin Administrator - Restore a Deleted Class
The Turnitin support team may be able to restore a class deleted from an instructor's account. Both instructors and administrators can make this request.
To make your request, simply click the Raise a Ticket button at the bottom of this page.
Please provide the class ID, class title, and the 9-digit paper ID of any paper submitted to this class.
Restoring a class will bring back access to Originality Reports, GradeMark, and PeerMark.
Note: There is no need to delete a Turnitin class, as this prevents students and instructors from accessing previous submissions, grades, and comments. You may instead expire a class by changing the class end date to a date in the past (e.g. yesterday). Expired classes are archived as view-only, and no further modifications will be allowed. If the expired class does not appear in your class list, please ensure that the All Classes or Expired Classes tab is selected. Any student enrolled in an expired class will not count against your school's Turnitin student limit.
Make a Request to a Turnitin Administrator - Locate a Missing Paper
The Turnitin support team are unable to access user's profile to track online activity. However, if a student believes a paper was submitted to Turnitin, but it appears to be missing, the paper's submission ID can be used to track the paper.
To make your request, simply click the Raise a Ticket button at the bottom of this page.
Please attempt to include the submission ID. Otherwise, provide the class ID, assignment title, student's name, and student's email address.
The submission ID can be found on a paper's digital receipt, which would have appeared on screen after submission; this may also have been sent to the student's email address. Please have the student check his or her junk and trash email folders for their digital receipt email.
Note: In future, it may be beneficial to advise all students to print out or write down their submission ID immediately after a submission is made. If they do not see the submission ID, then the paper was not accepted, and they will need to go through the process again. Many students make the mistake of uploading a paper, thinking it to be complete. Please note that there is a second step, which is to confirm the submission.
Make a Request to a Turnitin Administrator - Deactivate Your Account
The Turnitin support team can deactivate your user profile, providing you can prove ownership of the account.
To make your request, simply click the Raise a Ticket button at the bottom of this page.
Note: Deactivated accounts cannot be reactivated. Should you wish to use Turnitin in the future, you must create a new account.
Make a Request to a Turnitin Administrator - Consolidate Multiple Accounts
The Turnitin support team may be able to combine multiple Turnitin accounts.
To make your request, simply click the Raise a Ticket button at the bottom of this page.
Please ensure that the email address of each account you'd like to consolidate included. You must also specify the email address that you'd like to continue using in Turnitin.
You must be able to prove ownership of each email address to continue with the consolidation.
Note: Please be very certain that these accounts should be consolidated. Once consolidated, the process cannot be undone.
Similarity Reports - Viewing a Similarity Report
From the Turnitin Feedback Studio document viewer...
Click the filter and settings (funnel) icon from the product toolbar.
Choose to exclude, quotes and/or bibliography, then click Apply Changes.
Need further guidance? Read more...
Similarity Reports - Excluding Quoted Material
From the Turnitin Feedback Studio document viewer...
Click the filter and settings (funnel) icon from the product toolbar.
Using the checkboxes, choose to exclude quotes and/or bibliography.
Click Apply Changes.
Need further guidance? Read more...
Similarity Reports - Excluding Small Matches
From the Turnitin Feedback Studio document viewer...
Click the filter and settings (funnel) icon from the product toolbar.
Choose to exclude matches less than a specific percentage of words or number of words.
Click Apply Changes.
Need further guidance? Read more...
Similarity Reports - Generating a New Similarity Report
From the Turnitin Feedback Studio document viewer...
Click the filter and settings (funnel) icon from the product toolbar.
Click New Report, check the warning information, then click Refresh.
Note: The new report may take several minutes to generate.
Need further guidance? Read more...
Similarity Reports - Downloading Reports and Digital Receipts
From the Turnitin Feedback Studio document viewer...
Click the download (arrow) icon at the bottom of the product toolbar.
You have three download options: download current view, digital receipt, or originally submitted.
Click your preferred option to initiate download.
Note: To download the view with on-paper comments and similarity report information included, you must activate their respective layers before downloading current view.
Need further guidance? Read more...
Similarity Reports - Request Match Paper from Another Instructor
When a paper submitted to your class indicates a high percentage match to a paper submitted to a different institution, you can make a request to view this paper at another institution. Turnitin does not handle the paper exchange directly, but we do facilitate the transaction. Because of Turnitin's security and privacy policy associated with the student paper database, this information must to be passed from instructor to instructor outside of Turnitin.
From the Turnitin Feedback Studio document viewer...
Click the match overview (graph) icon from the product toolbar.
From the Match Overview side panel, click the arrow alongside the student paper source to reveal the match breakdown.
Click the matching paper of interest to reveal a pop-up window, with the paper contents hidden.
Click the full source view (book) icon in the top right-hand corner of the pop-up window.
From the Full Source Text side panel, click the heading titled 'Submitted to...' to open a new tab or window in your browser.
Click the send a request to view this paper button after reading the information provided.
A request will be sent via email to the other instructor. If the instructor replies to your request, the paper will be copied into the body of the return email.
Note: It is the choice of the Instructor that you contact as to whether they decide to share the paper. If the instructor that receives the request decides to share the paper, the process is as follows:
The instructor receives an email request.
The email will contain the 'original content' in the body of the email (the content being the full paper you've requested).
At this point, they can choose to reply. If they select reply, the original paper should be transferred in the body of the reply email.
The instructor making the request should have received the email from the instructor, granting access to the matching paper. Communication, at this point, may continue between instructors.
Note: Although Turnitin tries to make the paper transfer process as easy as possible, there can be some issues with transferring. For example, the receiving instructor may use an email client that strips the content or they might overwrite or delete the content accidentally. Turnitin plays no role in a match paper request after the original request has been made.
Similarity Reports - Excluding Sources
From the Turnitin Feedback Studio document viewer...
Click the match overview (similarity score) icon from the product toolbar.
Click the arrow alongside the match you would like to exclude sources for.
Click the Exclude Sources button at the bottom of the Match Breakdown side panel.
Use the checkboxes to exclude your chosen sources.
Click the Exclude button at the bottom of the Match Breakdown side panel, which will recalculate the originality score.
Note: For any sources stating that there are multiple URLs attached to them, double click them to view a breakdown of each individual URL.
Need further guidance? Read more...
Similarity Reports - Viewing and Restoring Excluded Sources
From the Turnitin Feedback Studio document viewer...
Click the excluded sources (no entry) icon from the product toolbar.
To restore only a select few sources, use the checkboxes to make your selection, then click the Restore button.
To restore all excluded sources, click the Restore All button.
Your restorations will provide you with an update similarity score.
Need further guidance? Read more...
Online Grading - Creating QuickMarks
From the Turnitin Feedback Studio document viewer...
Click the QuickMark (check/tick) icon from the product toolbar.
Click to reveal the drowdown menu from the QuickMarks side panel.
Click QuickMark Manager to reveal the manager window.
Click the menu (hamburger) icon in the top left-hand corner of the manager window.
Select the name of the set in which you'd like to add a new QuickMark.
Click the + icon alongside QuickMarks at the top of the manager window.
Enter your QuickMark details, then click Save.
You can now apply this QuickMark to a paper by closing the QuickMark manager, selecting the chosen set from the drop-down menu, then dragging the QuickMark comment anywhere on top of the paper.
Need further guidance? Read more...
Online Grading - Exporting/Downloading a QuickMark Set
From the Turnitin Feedback Studio document viewer...
Click the QuickMark (check/tick) icon from the product toolbar.
Click to reveal the drowdown menu from the QuickMarks side panel.
Click QuickMark Manager to reveal the manager window.
Click the menu (hamburger) icon in the top left-hand corner of the manager window.
Select a custom QuickMark set (this is a set not provided by Turnitin).
Click the menu (hamburger) icon once more, then click Download set.
Need further guidance? Read more...
Online Grading - Importing/Uploading a QuickMark Set
From the Turnitin Feedback Studio document viewer...
Click the QuickMark (check/tick) icon from the product toolbar.
Click to reveal the drowdown menu from the QuickMarks side panel.
Click QuickMark Manager to reveal the manager window.
Click the menu (hamburger) icon in the top left-hand corner of the manager window.
Select a custom QuickMark set (this is a set not provided by Turnitin).
Click the menu (hamburger) icon once more, then click Upload set.
You can either drag and drop your file(s) into the QuickMark manager or click browse to locate the file(s) on your device.
Once uploaded, click Open to view the QuickMark set.
Note: QuickMark sets can only be created, viewed, and edited in Turnitin. An instructor can download a .qms file and share this file with you, so that you can upload it to your Turnitin QuickMark manager for use.
Need further guidance? Read more...
Online Grading - Using Rubrics and Grading Forms
Rubric scorecards can be used to evaluate student work based on defined criteria and scales. Grading forms can be used to provide free form feedback and scores to evaluate student work based on defined criteria. The rubric scorecards can be created by the account administrator and shared to all instructors on an account. Instructors can also create and share rubric scorecards, allowing other instructors to upload the rubric scorecard to their classes.
Need further guidance? Read more...
Online Grading - Entering a Grade
From the Turnitin Feedback Studio document viewer...
Click the grade box in the top right-hand corner, displayed alongside the assignment's point value. e.g. -- /100.
Enter a grade into the textbox.
The grade box automatically displays ' -- ' until a grade is entered. Grades entered in this field will be saved to the grade book.
Logging In - Creating My Account
If you're a UK student, visit the TurnitinUK.com account creation form.
If you're a student outside of the UK, visit the Turnitin.com account creation form.
Fill in the account creation form, following the instructions provided.
The class ID and join password is required, and can only be gained from your instructor.
Need further guidance? Read more...
Logging In
If you're a UK student, visit the TurnitinUK.com login page.
If you're a student outside of the UK, visit the Turnitin.com login page.
Need further guidance? Read more...
Logging In - Deactivating My Account
If you would like your account to be deactivated, please contact Turnitin Support by clicking Raise a Ticket at the bottom of this page, and be very clear that you wish to deactivate your account.
Note: After deactivation, your papers will still be in the database. Only the Turnitin Administrator can request papers to be deleted from the database. If you wish to have your papers removed from the database, please liaise with your instructor. The paper IDs need to be provided for papers to be deleted.
Feedback - Viewing My Grade
From your student homepage, click the class name.
Click View next to the assignment for which you wish to view your grade.
In the Document Viewer, your grade is located in the top right-hand corner.
Need further guidance? Read more...
Feedback - Viewing Feedback from My Instructor
From your student homepage, click the class name.
Click View next to the assignment for which you wish to view your feedback.
In the Document Viewer, ensure GradeMark is selected in the top left-hand corner.
View your instructor's summary in the General Comments panel.
Click any blue marks on your paper to view specific comments from your instructor.
Click the comments list icon in the bottom right-hand corner to view all marks in one location.
If a rubric has been used, click the rubric icon in the bottom right-hand corner.
Scroll down to see the full size rubric in a new window.
Need further guidance? Read more...
Feedback - Listening to a Voice Comment
From your student homepage, click the class name.
Click View next to the assignment for which you wish to view your feedback.
In the Document Viewer, ensure GradeMark is selected in the top left-hand corner.
If you have a voice comment, click the play icon from the General Comments side panel to listen.
Click the pause icon to stop listening.
Enrolling - Enrolling in a Class
From your student homepage, click the Enroll in a Class tab.
Enter the class ID and join password. This can only be gained from your instructor.
Click Submit.
Need further guidance? Read more...
Enrolling - Enrolling as a TA
Click Student from the top of your student homepage, and change your user role to Instructor.
Click join a class as a teaching assistant
The master class ID and TA join password is required, and can only be gained from your instructor.
Set your section name and enrollment password. This information is chosen by you.
Click Submit.
Submitting - Submitting My Paper
Click the class name from your student homepage.
Click Submit for the assignment you wish to submit to.
Enter a submission title, then choose a file from your computer, Google Drive, or Dropbox.
Click Upload, check your submission, then click Confirm.
Need further guidance? Read more...
Submitting - Resubmitting My Paper
Click the class name from your student homepage.
Click Resubmit for the assignment you wish to resubmit to.
Click OK to acknowledge the Turnitin resubmission information.
Enter a submission title, then choose a file from your computer, Google Drive, or Dropbox.
Click Upload, check your submission, then click Confirm.
Submitting - Understanding File Formats for Submissions
If an assignment is set to allow any file type, Turnitin will accept any file less than 40mb, with a minimum of 25 words, and less than 400 pages.
If the assignment is set to allow only file types that Turnitin can check for originality, Turnitin will only accept files that can generate Originality Reports. This includes Microsoft Word® (.doc/.docx), OpenOffice Text (.odt), WordPerfect® (.wpd), PostScript (.ps/.eps), HTML, Hangul Word Processor file (.hwp), Rich text format (.rtf), Plain text (.txt), Google Docs via Google Drive™, Adobe® PDF, Microsoft PowerPoint® (.pptx, .ppt, .ppsx, and .pps), Microsoft Excel® (.xls and .xlsx).
Need further information? Read more...
Submitting - Tracking Down a Missing Paper
We require your paper's submission ID to track it in our system. You can find the ID on your digital receipt that appeared onscreen after you submitted your paper; it may also have been emailed to you. Please contact Turnitin Support with the ID, by clicking Raise a Ticket at the bottom of this page.
If you do not recall seeing a Submission ID, it is possible that the paper was not successfully uploaded. Remember that there are two steps when submitting a paper: upload and confirm. Please attempt to submit again until your paper is uploaded successfully, and you see a Submission ID onscreen.
Similarity - Viewing My Similarity Report
Your Similarity Report will be generated within ten minutes. Any resubmissions will generate a new report once every 24 hours. Please note that a delay in receiving a report may indicate that your instructor has opted to provide this only once they have posted feedback.
Click the class name from your student homepage.
Click View to open the Document Viewer.
Click the Originality button in the top left-hand corner.
View and utilize the Match Overview side panel to the right of the window.
Need further guidance? Read more...
Similarity - Interpreting a Similarity Report
Turnitin does not check for plagiarism in a piece of work. Instead, we will check your work against our database. If there are instances where your writing is similar to, or matches against, one of our sources, we will flag this for your instructor to review.
It is perfectly natural for an assignment to match against some of our database. If you have used quotes and have referenced correctly, there will be instances where a match will be found. The Similarity Score Index simply makes your instructor aware of any problem areas in your paper; they will then use this as a tool as part of a larger process, in order to determine if the match is or is not acceptable.
Need further information? Read more...
Peer Evaluation - Selecting Papers to Review
Click the class name from your student homepage.
Click Write Reviews for the relevant PeerMark assignment.
Click select a paper to review*
Look through the available papers to review, then click Review this submission.
Click Yes, continue to PeerMark to begin reviewing your selection.
*The number of links entitled select a paper to review signify the number of papers you have been assigned to review. As you select a paper to review, the select a paper to review link will change to the title of the selected paper.
Need further guidance? Read more...
Peer Evaluation - Writing a Peer Review
Click the class name from your student homepage.
Click Write Reviews for the relevant PeerMark assignment, then click Start Review.
From the PeerMark Document Viewer, answer the peer review questions in the right-hand panel.
Click Save to save your review and return to the PeerMark Document Viewer later.
Or click Submit to submit your review.
Need further guidance? Read more...
Peer Evaluation - Adding Comments to a Peer Review
From the PeerMark Document Viewer, simply click anywhere on the paper you're reviewing.
Type your comment, then click Save.
To add composition marks and inline comments, click Tools from the top-left hand corner.
Select the comment you require, then click on the paper to place it down.
All comments made can be viewed from the right-hand side panel.
Click the Comments tab to view your comments.
To remove a comment, click the comment, then click the trash can icon.
To edit a comment, click the comment, then click the Edit button, and make your changes.
Need further guidance? Read more...
Peer Evaluation - Reading Reviews Left by My Peers
Click the class name from your student homepage.
Click Read Reviews for the relevant PeerMark assignment, then click Student.
From the PeerMark Document Viewer, you can view your peers answers.
Click the Comments tab in the right-hand panel to view all comments made by your peer.
Need further guidance? Read more...
Peer Evaluation - Using PeerMark in the Document Viewer
From your student homepage, click the class name.
Click View next to the assignment for which you wish to open in the Document Viewer.
Ensure GradeMark is selected in the top left-hand corner of the Document Viewer.
The main overview in the PeerMark side panel will display all students who have reviewed your paper.
In the bottom right-hand corner of the PeerMark side panel, click the question mark icon.
From the All Reviews section, you can view all answers to PeerMark questions.
Click the menu icon to view a list of comments made by your peer.
Need further guidance? Read more...
Deleting a Paper
Please contact your Turnitin instructor regarding the deletion of a paper from the Turnitin database. Your instructor should then contact your institution’s Turnitin administrator. All paper deletion requests must be submitted in writing by the Turnitin administrator. Please provide your instructor with the class ID, assignment name, and the submission ID associated with the paper. The submission ID can be found on your digital receipt, available in the receipt email sent after submission.
There is no need to delete a paper from the database if you simply wish to submit a revised version of your paper. Please contact your instructor regarding resubmissions, who can enable this option.
Setting up and Managing Your Account - Creating a Sub-Account
From your administrator homepage, click the new account (green +) icon next to your account name.
Enter an account name and choose a join password.
You can optionally add a sub-administrator by entering their details.
Select the features that you'd like to allow your instructors to use.
Customize further sub-account options, then click Submit.
Need further guidance? Read more...
Setting up and Managing Your Account - Enabling and Disabling Product Features
From your administrator homepage, click Edit next to the account you wish to edit.
Click Edit account settings.
Under the Allow these features section, select or deselect the features you wish to enable or disable.
Click Submit.
Need further guidance? Read more...
Setting up and Managing Your Account - Adding a Sub-Administrator
From your administrator homepage, click Edit next to the account you wish to edit.
Click Edit account settings.
Enter the first name, surname and email address of the sub-administrator.
Click Submit.
Depending on whether the sub administrator is a new or existing Turnitin user, they will either be sent a notification email, or an email providing them with a temporary password to create an account with.
Need further guidance? Read more...
Setting up and Managing Your Account - Changing Repository Options
From your administrator homepage, click Edit next to the account you wish to edit.
Click Edit account settings.
Select one of the three options from the paper repository options: enable instructor standard repository options, enable instructor expanded repository options, or submit all papers to the standard repository.
Click Submit.
Need further guidance? Read more...
Setting up and Managing Your Account - Changing Source Release Options
From your administrator homepage, click Edit next to the account you wish to edit.
Click Edit account settings.
Select one of three options from the paper source release options: Inherit paper source release setting from parent account, Disable source release for this account, or Enable source release for this account.
Click Submit.
Need further guidance? Read more...
Setting up and Managing Your Account - Configuring an Integration in Turnitin
From your administrator homepage, click the Unconfigured button for the account you wish to configure.
If an integration is already configured, click the Configured button for the account you wish to configure.
From the integrations dashboard, select either Blackboard Direct, Moodle Direct, or LTI API to begin or amend your LMS configuration.
Fill out the required fields listed in the Configuration form:
Create a shared key, containing 8 alphanumerical characters.
Enter your institution's IP address or default IP address: 255.255.255.255
Enter an error callback URL or the default url: https://www.turnitin.com/api_error.asp or https://www.turnitinuk.com/api_error.asp (UK Only)
Check the box to agree to the terms, and click Save.
Following this, you must then configure the integration within your LMS.
Need LMS configuration guidance? Read more...
Setting up and Managing Your Account - Setting a Shared Key
From your administrator homepage, click the Unconfigured button for the account you wish to configure.
If an integration is already configured, click the Configured button for the account you wish to configure.
From the integrations dashboard, select either Blackboard Direct, Moodle Direct, or LTI API to begin or amend your LMS configuration.
Create a shared key, containing 8 alphanumerical characters. The shared key is required for configuring a Turnitin integration in an LMS.
To complete configuration, fill out the remaining required fields listed, then click Save.
Need further information? Read more...
Setting up and Managing Your Account - Changing Your User Information
Click the User Info link from the top of any Turnitin page.
Modify the necessary information.
Click submit to save these changes.
You will receive a confirmation e-mail if you have changed your email address or password.
Need further information? Read more...
Setting up and Managing Your Account - Changing an Account Join Password
From your administrator homepage, click the Edit icon next to the account you wish to edit.
Click Edit account settings.
Find the Join password field and amend the password displayed.
Click submit to save the change.
Note: Instructors who are already enrolled on the account will continue to have access to the Turnitin account, even after changing the account join password. Should you wish to restrict access to certain instructors, click here to view guidance on locking and unlocking instructors.
Managing Instructors - Adding Instructors
From your administrator homepage, click the Instructors tab.
Click the Add Instructor button.
Enter your instructor's details, then click Submit.
Need further guidance? Read more...
Managing Instructors - Adding Instructors from a List
An instructor list must be 100 entries or less. The list must be a Microsoft Word, Excel, or plain text (.txt) file. The student's first name, last name, and Email address must be provided. To create your list, view our Word, Plain text and Excel formatting examples.
From your administrator homepage, click the Instructors tab.
Click the Upload List button.
Choose the file you wish to upload, then click Upload List.
Review your uploaded list in Turnitin, then click Yes, Submit.
Note: An instructor list must be 100 entries or less. The list must be a Microsoft Word, Excel, or plain text (.txt) file. The student's first name, last name, and Email address must be provided. To create your list, view our Word, Plain text and Excel formatting examples.
Need further guidance? Read more...
Managing Instructors - Locking and Unlocking Instructors
Instructors can be locked or unlocked from an account once they have logged into Turnitin with their user profile. Locking an instructor will prevent them from using the account they are joined to.
From your administrator homepage, click the Instructors tab.
Click the padlock icon next to the instructor you wish to lock or unlock, then click OK.
Need further guidance? Read more...
Managing Instructors - Removing Instructors
From your administrator homepage, click the Instructors tab.
Click the trash can icon next to the instructor you wish to remove, then click OK.
Once an instructor has been dropped by the account administrator, the user profile that was dropped can only re-join the account by being added by the account administrator directly from the instructors page.
Need further guidance? Read more...
Logging In - Logging In
If you're a UK administrator, visit the TurnitinUK.com login page.
If you're an administrator outside of the UK, visit the Turnitin.com login page.
Need further guidance? Read more...
Logging In - Resetting Your Password
If you're a UK administrator, visit the TurnitinUK.com password reset page.
If you're an administrator outside of the UK, visit the Turnitin.com password reset page.
Your email and last name is required for reset, and you must answer your secret question.
If you can't remember the answer, click Forgot your answer.
Account Limits and Renewals - Viewing Account Limits and Active Products
Click the name of the account from your administrator homepage.
The account status page will open to display the Turnitin products.
Available accounts are displayed, as well as the expiration dates for these products.
Detailed usage information, including the student limit and total active students are displayed.
Need further information? Read more...
Account Limits and Renewals - Resolving Student Limit Issues
Multiple enrollments: Multiple enrollments can occur when a single student creates a new account for different classes within the same institution.
Please advise students to visit the Turnitin support wizard directly and simply click the Raise a Ticket button at the bottom of this page.
Our support team can merge multiple accounts into one, whilst retaining student submissions, providing the student can prove ownership of each email address. Students must specify which email address that they would like to continue using in Turnitin, and provide the email address of all accounts that require consolidation. Once consolidated, this process cannot be undone.
Instructors may also remove multiple enrollments by dropping students' old accounts. However, this will delete student submissions.
Students in expired classes: Students in expired classes do not count against your institution’s student limit. If instructors do not expire outdated classes, students from a previous term will still be counted. Please advise your instructors to expire any unused classes. You can do this by sending an email to all instructors on your account.
Account Statistics - Viewing Account Statistics
From your administrator homepage, click the stats icon next to the account name.
Alternatively, to view statistics for all accounts, from your administrator homepage, click the Stats tab.
Choose the date range for the statistics you wish to view, then click Update Statistics.
Need further guidance? Read more...
Account Statistics - Downloading Account Statistics
From your administrator homepage, click the stats icon next to the account name.
Alternatively, to view statistics for all accounts, from your administrator homepage, click the Stats tab.
Click the download icon in the top right-hand corner of the statistics section.
Click Export the Excel.
Need further guidance? Read more...
Communicating with Instructors - Emailing a Specific Instructor
From your administrator homepage, click the Instructors tab.
Click on the email address of the instructor you wish to email to open your default email client.
Alternatively, copy the email address and paste it into your preferred email client.
Need further guidance? Read more...
Communicating with Instructors - Emailing All Instructors on an Account
From your administrator homepage, click the Instructors tab.
Click the Email All button.
Compose your email, then click Send.
Need further guidance? Read more...
QuickMarks, Rubrics, and Grading Forms - Creating QuickMark Sets and Marks
From your administrator homepage, click the Instructors tab.
Click the QuickMark Library tab from the top of the Instructors page.
Click the + icon to the right of the Sets header to add a set.
Enter a title for the QuickMark set, then click Save.
Within the set, you can add a QuickMark. Simply click the + icon to the right of the Marks header.
Enter the title and description of the QuickMark, then click Save.
Check the Share this set to account to make this set available to your instructors.
Need further guidance? Read more...
QuickMarks, Rubrics, and Grading Forms - Creating Rubric Scorecards in Turnitin
From your administrator homepage, click the Instructors tab.
Click the Rubric/Form Library tab from the top of the Instructors page.
Click the menu icon in the top left-hand corner of the rubric.
Click Create new rubric.
Enter the rubric name.
Edit the criterion and scales by clicking on their title, description and point value boxes.
Click anywhere outside of the boxes to finish.
To add more criteria or scales, click the + icon.
Click Save in the bottom right-hand corner of the rubric.
Need further guidance? Read more...
QuickMarks, Rubrics, and Grading Forms - Creating Rubric Scorecards in Excel
To create a rubric scorecard in Microsoft Excel, please follow the guidelines detailed below.
The rubric in the spreadsheet must have the scales of the rubric as its first row.
The rubric in the spreadsheet must have the criteria of the rubric as the first column.
Descriptors for the body of the rubric can be included.
Criteria titles must be 13 characters or less.
The rubric in the spreadsheet can have no more than 20 scale value columns.
The rubric in the spreadsheet can have no more than 50 criteria rows.
If you would like to use scoring for your rubric, please add it using the Rubric/Form Library after you import.
Should you wish to edit any aspect of your rubric after import, please using the Rubric/Form Library.
Need more help? Download an example template here.
QuickMarks, Rubrics, and Grading Forms - Creating Grading Forms
From your administrator homepage, click the Instructors tab.
Click the Rubric/Form Library tab from the top of the Instructors page.
Click the menu icon in the top left-hand corner of the rubric.
Click Create new grading form.
Enter the criteria titles and descriptions.
To add more criterion, click the + icon.
Click Save in the bottom right-hand corner of the grading form.
Need further guidance? Read more...
QuickMarks, Rubrics, and Grading Forms - Editing an Exported Rubric File (.rbc)
A rubric can only be edited within Turnitin and cannot be edited or opened using any other software. When a rubric scorecard is exported, the resultant file type saved to your computer has an extension of .rbc - a file type only compatible with Turnitin. A rubric (.rbc) file can be imported, exported, edited, and viewed from within the Turnitin system, using the Rubric/Form Library.
QuickMarks, Rubrics, and Grading Forms - Sharing Rubrics and QuickMarks to an Account
You can share Rubric and QuickMark sets to all instructors joined to the institution’s account.
To share a rubric or grading form, from your administrator homepage, click the name of the account you wish work with.
Click the Rubric/Form Library tab at the top of the page and locate the rubric you wish to share.
Click the blue share icon to the top right of the Rubric Manager. The icon looks like an arrow pointing outwards.
Click Share to account, then click OK to confirm this.
To share a QuickMark set, from your administrator homepage, click the name of the account you wish work with.
Click the QuickMark Library tab at the top of the page and locate the QuickMark set you wish to share.
Click the blue share icon to the top right of the Rubric Manager. The icon looks like an arrow pointing outwards.
Click Share to account, then click OK to confirm this.
Note: Sets with lock icons will not have the share option, as they are already available to all instructors by default. Instructors will not be able to modify the shared library, but they will be able to use them.
Integrations - Configuring an LTI API Integration in an LMS
As an LTI tool provider, Turnitin can be integrated with LMS LTI consumers. Many LMS' (for example Canvas, Desire2Learn and Sakai) are LTI compliant. The Turnitin Tool supports OriginalityCheck, GradeMark, and PeerMark.
To use the Turnitin LTI 1.1 API, administrators must provide the following items within the LMS LTI configuration screen:
Please choose an URL for the Turnitin paper assignment (also named 'Configuration URL'), based on your location:
https://api.turnitinuk.com/api/lti/1p0/assignment (UK users only) or
https://api.turnitin.com/api/lti/1p0/assignment (all other users).
Enter your account ID.
Enter your shared key (configured in the Turnitin LTI integration setup). Your shared key is 8 digits long and can be found from your integrations dashboard in Turnitin.
In order to launch the Turnitin Tool correctly and ensure that the LMS and Turnitin users are mapped properly, you must allow the LMS to send the user email address.
Need further LTI guidance? Read more...
Integrations - Finding Moodle Guidance
Turnitin can be integrated into Moodle using the Moodle Direct V1 or V2 plug-in. These plug-ins provide a Moodle-like experience for delivering Turnitin Originality Checking and GradeMark. PeerMark is available for V2 only.
Need Moodle guidance? Read more...
Integrations - Finding Blackboard Guidance
Turnitin can be integrated into Blackboard using the Blackboard Basic, Blackboard Direct and Blackboard Direct 2.5 plug-in. Blackboard Basic allows access to all Turnitin services (OriginalityCheck, GradeMark and PeerMark) without having to leave the Blackboard environment or log into Turnitin directly. The Direct plug-ins provide a Blackboard-like experience for delivering Turnitin Originality Checking and GradeMark. PeerMark is available in 2.5 only.
Need Blackboard guidance? Read more...
Setting up and Managing Your Account - Configuring an Integration in Turnitin
From your administrator homepage, click the Unconfigured button for the account you wish to configure.
If an integration is already configured, click the Configured button for the account you wish to configure.
From the integrations dashboard, select either Blackboard Direct, Moodle Direct, or LTI API to begin or amend your LMS configuration.
Click the name of the LMS you wish to configure.
Fill out the required fields listed in the Configuration form:
Create a shared key, containing 8 alphanumerical characters.
Enter your institution's IP address or default IP address: 255.255.255.255
Enter an error callback URL or the default url: https://www.turnitin.com/api_error.asp or https://www.turnitinuk.com/api_error.asp (UK Only)
Check the box to agree to the terms, and click Save.
Following this, you must then configure the integration within your LMS.
Need LMS configuration guidance? Read more...
Setting up and Managing Your Account - Setting a Shared Key
From your administrator homepage, click the Unconfigured button for the account you wish to configure.
If an integration is already configured, click the Configured button for the account you wish to configure.
From the integrations dashboard, select either Blackboard Direct, Moodle Direct, or LTI API to begin or amend your LMS configuration.
Create a shared key, containing 8 alphanumerical characters. The shared key is required for configuring a Turnitin integration in an LMS.
To complete configuration, fill out the remaining required fields listed, then click Save.
Need further information? Read more...
Setting up and Managing Your Account - Updating an LMS Plugin
Using the latest version of a plugin to integrate with a Learning Management System (LMS) is recommended, as it will include the very latest updates available.
Before using a new plugin, please install it in a test environment before applying it to a production site whenever possible.
To download the latest version of a plugin, please visit the Download Integrations page.
Click the name of the platform to download the plugin.
Click the Documentation link to follow the update/installation instructions for your specific LMS.
Follow the Administrator User Manual instructions to install the code package on your LMS server.
Note: Do not delete the plugin or any files unless specifically instructed to do so in a manual. Generally, the updated plugin will override the current file used to integrate with the LMS. During the installation, creation of Turnitin assignments will be unavailable, and submission to Turnitin assignments are also likely to become unavailable. The tool will be functional after the upgrade with no need to reinitialize it.
Turnitin Feedback Studio - Toggling the Beta Mode on or off
From your administrator homepage, use the on/off toggle in the Feedback Studio (Beta) column to active Beta Mode.
You will be asked to confirm this activation. Click Turn on to confirm or Cancel to return to your administrator homepage.
Note: Turning the Feedback Studio (Beta Mode) on will switch the default version of the document viewer to the Feedback Studio. This will affect all users in this account. Individual users will still have the option to toggle between Classic Turnitin and Feedback Studio from inside the document viewer. Should the Feedback Studio (Beta Mode) be switched off, all instructors and students in this account will default back to Classic Turnitin without the possiblility of switching back to Feedback Studio.
Need further guidance on managing the Turnitin Feedback Studio (Beta Mode)? Read more...
Turnitin Feedback Studio - Using the Beta Across Multiple Accounts
For users who are joined to more than one account, their access to Turnitin Feedback Studio (Beta Mode) is dependent on their administrator having toggled the beta on or off. An instructor or student can have access to both the Feedback Studio and the Classic version of Turnitin in one instance, as their accounts may be managed by more than one administrator.
Need further guidance on managing the Turnitin Feedback Studio (Beta Mode)? Read more...
Turnitin Feedback Studio - Feedback Studio Guidance for Instructors and Students
Educate your users with comprehensive Feedback Studio user guides, available at Guides.turnitin.com. This is documentation for an evolving in-development product. Content and functionality is subject to change as we continue to improve and implement new features.
Need instructor guidance? Click here to access the Feedback Studio instructor guide.
Need student guidance? Click here to access the Feedback Studio student guide.
Resolving Technical Issues
Turnitin operates via your computer's internet browser; no computer install is required. If you are experiencing issues with Turnitin, systematically follow the steps below to identify the cause of your issue.
Please confirm that your computer meets the minimum system requirements.
Try to access Turnitin via an alternative internet browser.
Update your Java to the latest version available.
Ensure your browser’s pop-up blocker is temporarily disabled while using Turnitin.
Add the following URLs to your firewall's safe list: *.turnitin.com, cdn.turnitin.com, *.edgecastcdn.net, *.turnitinuk.com (the * symbol must also be included).
Try temporarily disabling your firewall while determining the cause of the problem. Many anti-virus applications have firewalls built-in (e.g. McAfee, Norton, or AVG).
Close your entire web browser and restart your computer.
Open your browser, then try to access Turnitin again.
If your issues persist, please consider accessing Turnitin via a different computer.
Viewing Turnitin Release Notes
We are constantly working to improve our service, and perform regular system updates to implement new features, fix any bugs, and ensure the system is working correctly during peak submission times.
Want to stay up to date on each of our releases? Read more...
Make New Feature Suggestions
We love hearing new and innovative ideas on how we can improve Turnitin. Simply drop our Product Support team an email with ‘FEEDBACK’ in the title, and we’ll make sure the right team gets your input.
You can contact our support team at tiisupport@turnitin.com
Make a Request to Turnitin Support - Delete a Paper from the Database
A student submission can be permanently deleted from the Turnitin database so that it can no longer be used as a searchable source. For contractual reasons, all paper deletion requests must be submitted in writing by the Turnitin administrator.
To make your request, simply click the Raise a Ticket button at the bottom of this page.
Please ensure that the class ID, assignment name, and the submission ID associated with the paper is included.
You will then receive a ticket confirmation by email.
So that we can validate your request, you must respond to this email, which will allow us to match your ‘reply to’ address with the email address held on file for you.
Note: Rather than having to delete papers from the database, instructors may find it easier to create assignments that will not store submitted papers in the Turnitin database. They should select No repository when creating or amending an assignment. Click here for guidance on repository options.
Make a Request to Turnitin Support - Restore a Paper
If an instructor has accidentally deleted a student paper from the assignment inbox, it may be possible for the Turnitin support team to restore the paper.
To make your request, simply click the Raise a Ticket button at the bottom of this page.
Please provide the following information: Class ID, name/title of the assignment, student's first and last name, student's email address and, if known, their submission ID.
Note: If a paper has been deleted from the assignment inbox and no submission is showing for the student, it is usually possible to restore a paper. However, if a new paper was submitted after the paper's deletion, it will be overwritten by the new submission and cannot be recovered. If the No Repository option was selected for this assignment, a 90-day grace period will allow a paper's restoration; on day 91, the deleted paper will be purged from our database and cannot be restored.
Make a Request to Turnitin Support - Restore a Deleted Class
The Turnitin support team may be able to restore a class deleted from an instructor's account. Both instructors and administrators can make this request.
To make your request, simply click the Raise a Ticket button at the bottom of this page.
Please ensure that the instructor's full name and email address is included.
You must also provided the class ID, title, and the 9-digit paper ID of any paper submitted to this class.
Restoring a class will bring back access to Originality Reports, GradeMark, and PeerMark.
Note: Please advise your instructors that there is no need to delete a Turnitin class, as this prevents students and instructors from accessing previous submissions, grades, and comments. Instructors may instead expire a class by changing the class end date to a date in the past (e.g. yesterday). Expired classes are archived as view-only, and no further modifications will be allowed. If the expired class does not appear in your class list, please ensure that the All Classes or Expired Classes tab is selected. Any student enrolled in an expired class will not count against your school's Turnitin student limit.
Make a Request to Turnitin Support - Locate a Missing Paper
The Turnitin support team are unable to access user's profile to track online activity. However, if a student believes a paper was submitted to Turnitin, but it appears to be missing, the paper's submission ID can be used to track the paper.
To make your request, simply click the Raise a Ticket button at the bottom of this page.
Please ensure that the submission ID is included.
The submission ID can be found on a paper's digital receipt, which would have appeared on screen after submission; this may also have been sent to the student's email address. Please have the student check his or her junk and trash email folders for their digital receipt email.
Note: In future, it may be beneficial to advise all students to print out or write down their submission ID immediately after a submission is made. If they do not see the submission ID, then the paper was not accepted, and they will need to go through the process again. Many students make the mistake of uploading a paper, thinking it to be complete. Please note that there is a second step, which is to confirm the submission.
Make a Request to Turnitin Support - Deactivate Your Account
The Turnitin support team can deactivate your user profile, providing you can prove ownership of the account.
To make your request, simply click the Raise a Ticket button at the bottom of this page.
Note: Deactivated accounts cannot be reactivated. Should you wish to use Turnitin in the future, you must create a new account.
Make a Request to Turnitin Support - Change the Account Administrator
If you are an administrator, but no longer wish to be...
From your administrator homepage, click Edit next to the account name, then click Edit account settings.
Enter the new administrator's email address, first name, and last name, then click Submit.
If you no longer have an account administrator available for your institution...
Fax us the request on your institution's official letterhead, including your name, job title, and signature.
You should also include the previous administrator's name, email address, and contact number.
Please fax to our primary fax line: (510) 764-7612, alternate fax line (and for international requests): (510) 764-7613, or UK request fax line: 0845 643 9015. You can also scan the document and email to tiisupport@turnitin.com as an attachment.
Make a Request to Turnitin Support - Consolidate Multiple Accounts
The Turnitin support team may be able to combine multiple Turnitin accounts.
To make your request, simply click the Raise a Ticket button at the bottom of this page.
Please ensure that the email address of each account being used is included. You must also specify the email address that you'd like to continue using in Turnitin.
You must be able to prove ownership of each email address to continue with the consolidation.
Note: Please be very certain that these accounts should be consolidated. Once consolidated, the process cannot be undone.
Google Single Sign-On FAQs for Administrators
Below is a list of FAQs for Turnitin administrators interested in learning more about Google Single Sign-On.
What is Google Single Sign-On (SSO)?
Google SSO allows users whose institution uses G Suite to save time by accessing Turnitin Feedback Studio and Originality Check with their organization’s email and password instead of creating separate Turnitin credentials. Only users who access Turnitin either through turnitin.com or turnitinuk.com, are eligible for Google SSO. See this video for what the login looks like.
How can I sign up for Google SSO?
- Log into your administrator homepage.
- Go to the account settings page for any active account.
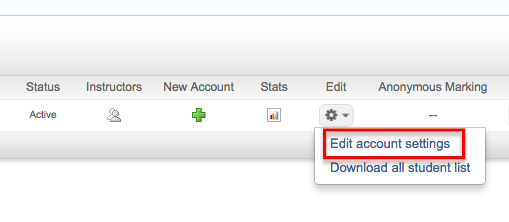
- Click on the link for the Google SSO registration form located at the bottom of the account settings page.
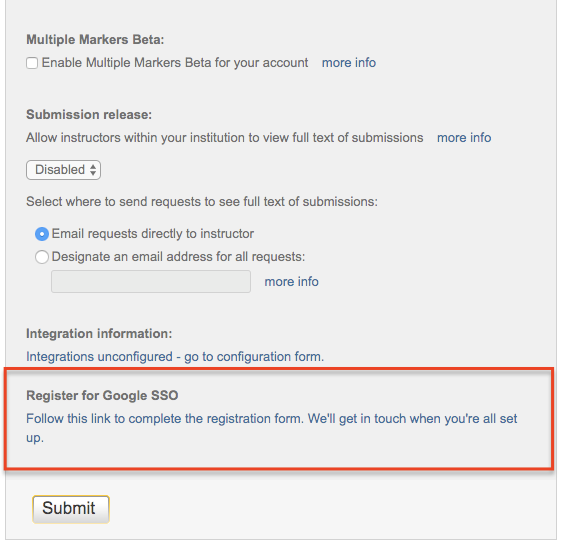
- Fill out the registration form. Within 10 business days of completing the form, you’ll receive an email confirming that we’re finished setting you up and you can start logging in via Google SSO.
When will Google SSO be available?
The Google SSO “Sign in with Google” button will appear on turnitin.com and turnitinuk.com at the end of January and be visible to everyone who visits the site.
What if my school wants to use Google SSO and is part of a larger district or organization?
Please check with your district’s technical administrator before completing the enrollment form to ensure that your district will allow your school to use Google SSO.
How can I find my Turnitin account ID number in order to fill out the enrollment form?
Log into Turnitin as an administrator. Then look for the Account ID under the Accounts tab on the administrator homepage -- see red box below.
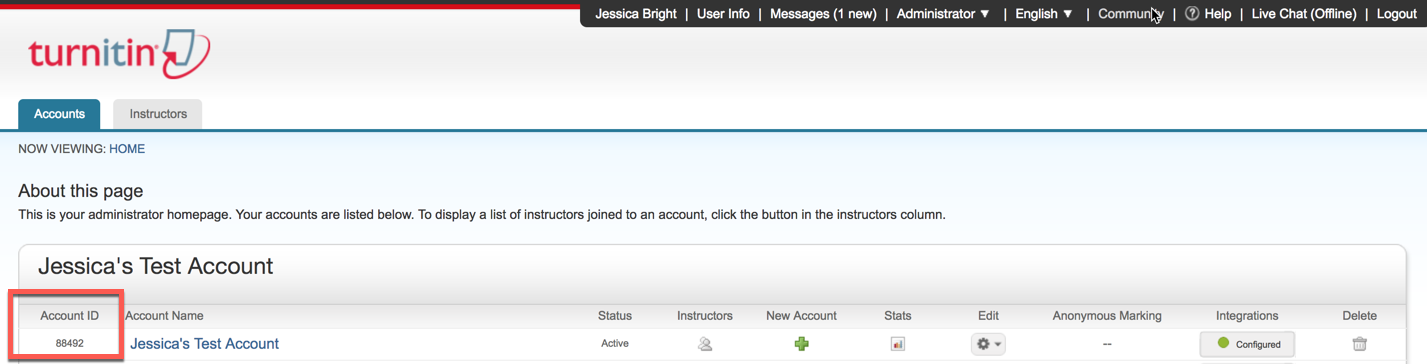
Will there be any fees associated with using Google SSO?
No, Turnitin Feedback Studio and Originality Check customers can use Google SSO for free.
Whom should I contact for questions about filling out the enrollment form?
Please email tiisupport@turnitin.com for questions about the form.